Rainbow Cake (and a Giveaway!)
Jump to the recipe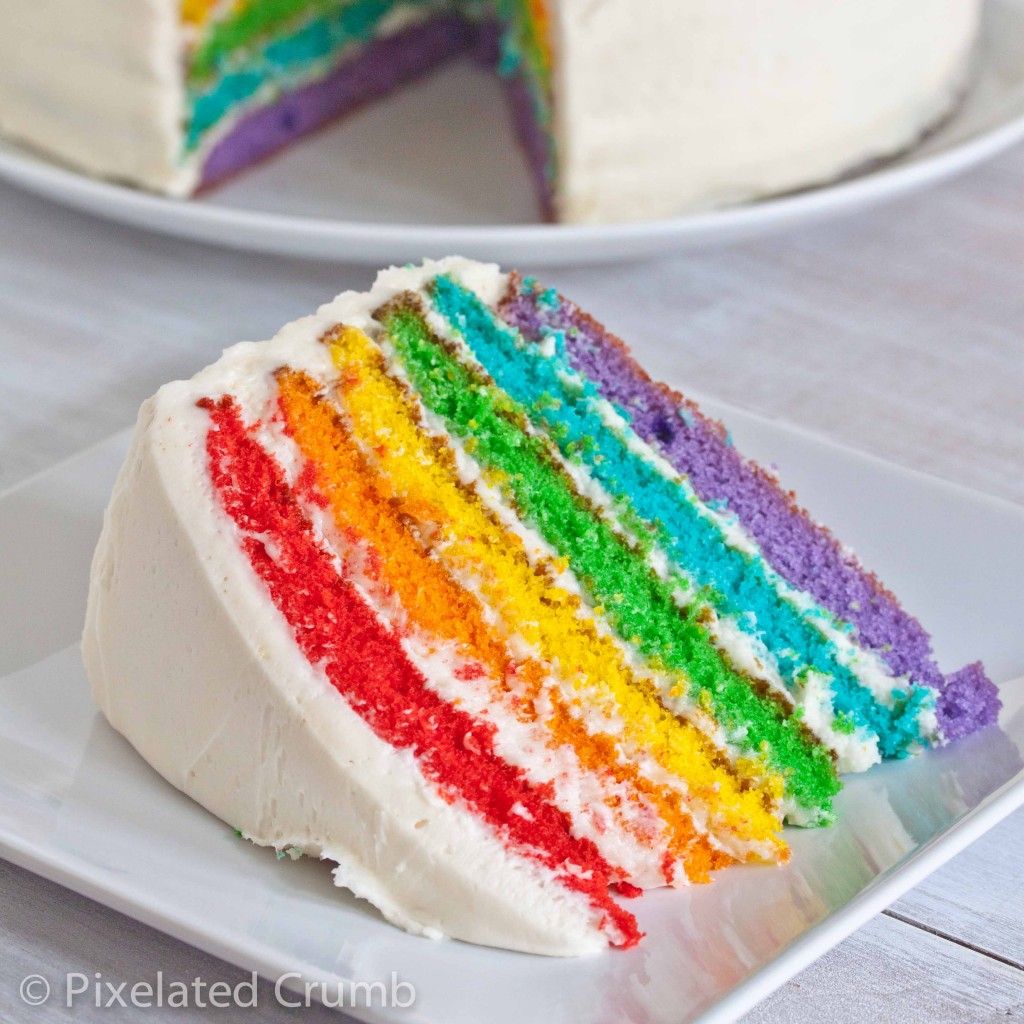
When my friend Michelle from Creative Food asked if I would make a rainbow cake for her daughter Eliana’s fourth birthday party, I have to admit, I wasn’t so sure about it. All those layers! But I just couldn’t resist the pull of all those beautiful, bright colors. Mostly though, I just couldn’t disappoint Eliana.
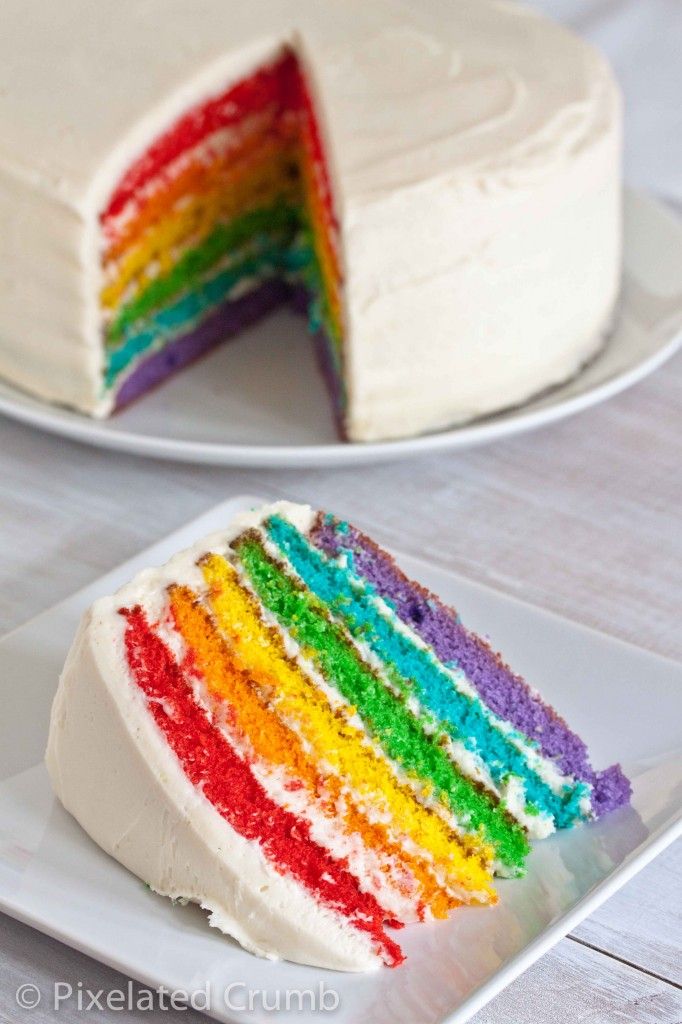
Eliana had asked for a rainbow birthday party and wanted a rainbow cake. I decided, hey, why not, and delved right in. And you know what? It turns out the cake actually isn’t all that hard to make, although it is a little time consuming. It’s just one big cake recipe that is then divided into six bowls and dyed with gel food coloring. And I totally took the easy way out and made a very simple white frosting from America’s Test Kitchen rather than buttercream. As much as I prefer buttercream, the idea of making a six layer cake and standing over the stove whipping up two batches of buttercream was just too much for me.

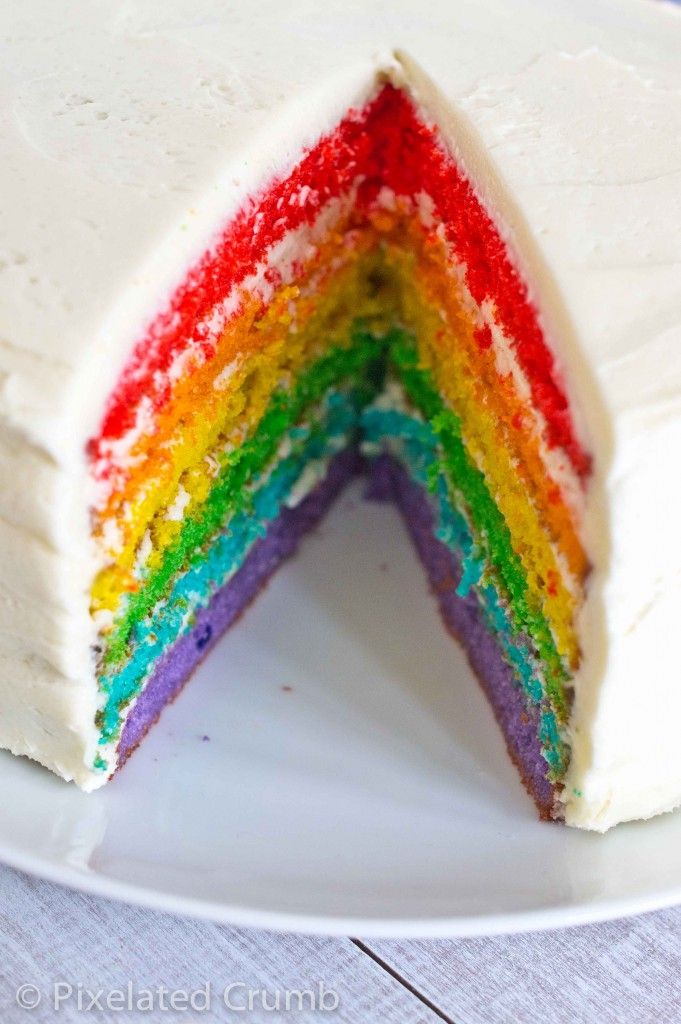
The itsy bitsy problem was that I underestimated the amount of frosting I would need and ran out. I was already running late at that point and nearly had a panic attack when I saw how little powdered sugar I had left, but I eked out another half recipe and – huge sigh of relief – it was just enough. The other piece of good news was that Michelle wanted the outside to be just plain white with no decorations. That was fantastic for me because cake decorating is an art of its own and is not my forte. To the naked eye the cake looks relatively boring. That is, until you cut into it to reveal an explosion of color.
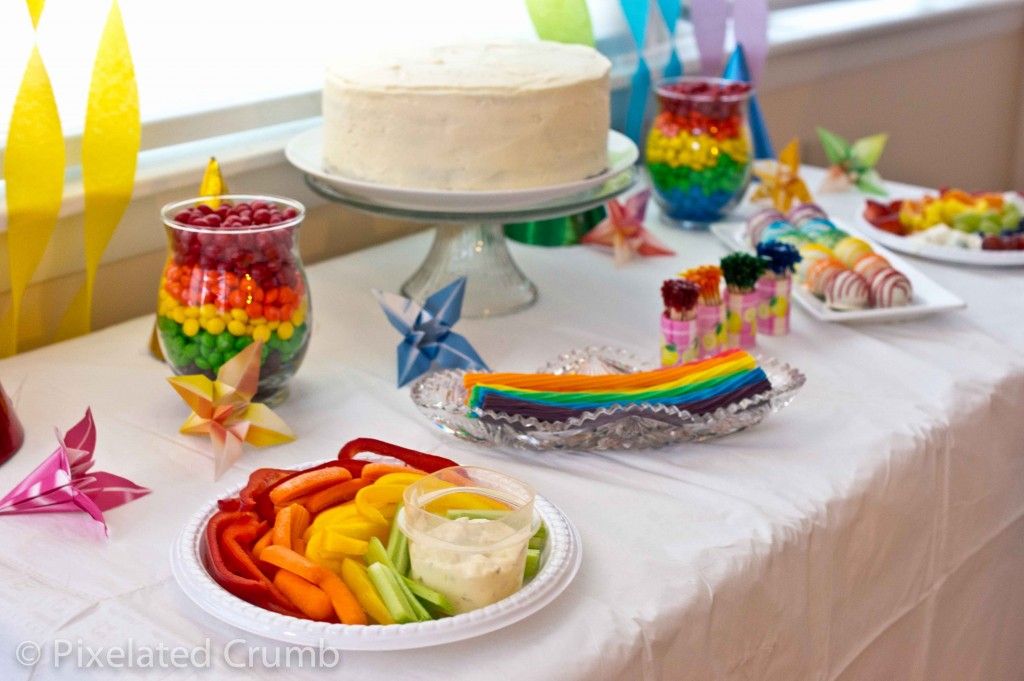
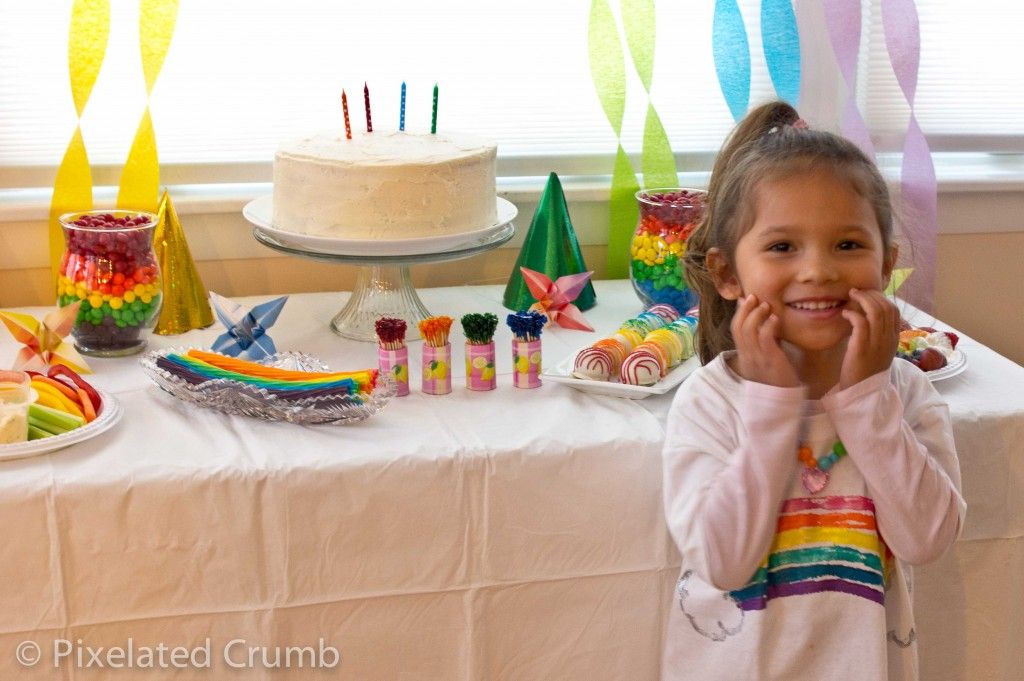
Michelle had created a stunning display array of rainbow goodies. She really went all out so make sure to check out her blog post for more details. I really shouldn’t have been surprised given the creativity that oozes out of her blog, but it was seriously impressive. The best touch was the set of rainbow shirts Michelle, her husband, David, and Eliana had made the day before. When they lined up together with Eliana in the middle, she and her parents created a big rainbow.
Just as planned, everyone thought I had brought a plain, boring white cake. Eliana was clearly disappointed and reminded me that I was supposed to make a rainbow cake. But when she blew out the candles and her dad cut into the cake, the room filled with oohs and ahhs. The smile and utter amazement on Eliana’s face made it all worth it. All the stress of getting the cake there in time disappeared and a sense of euphoria washed over me. The cake I had been stressing out about all week was finally done and she loved it.
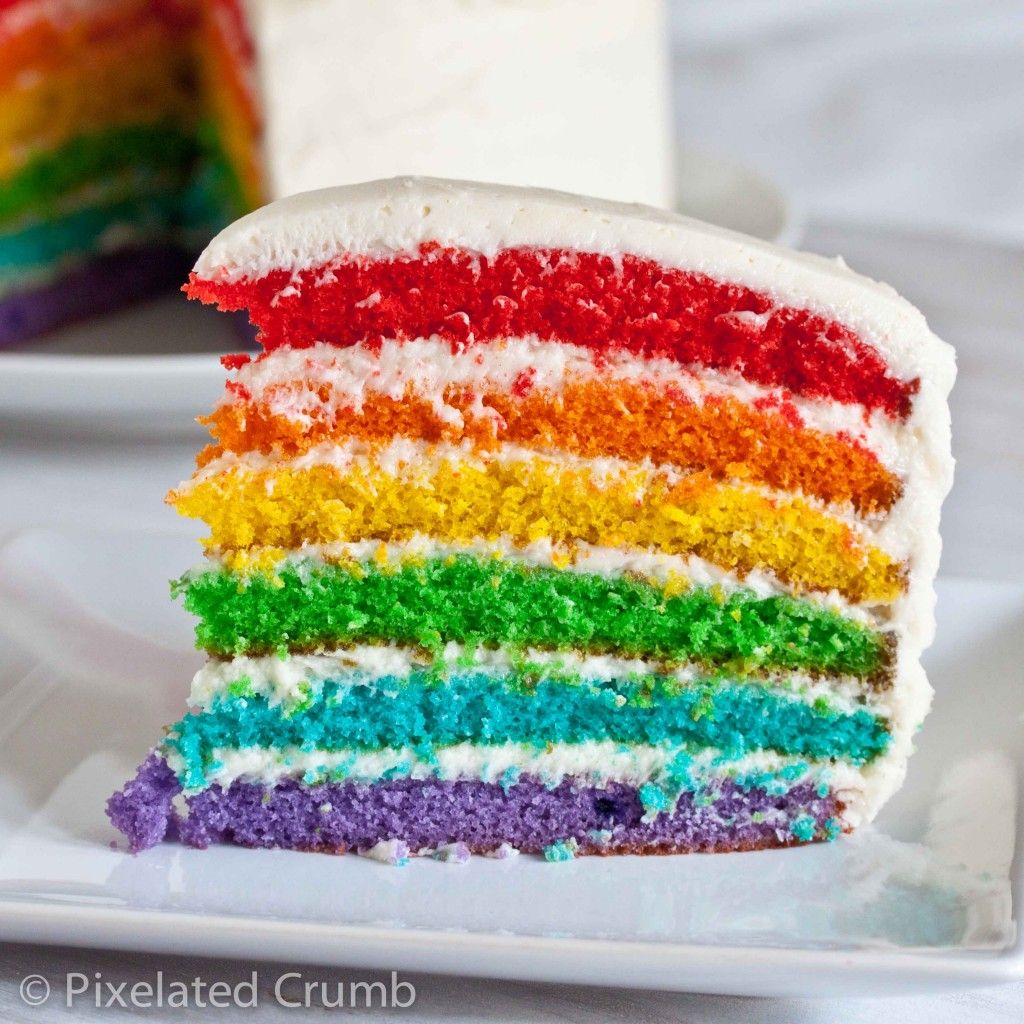
I was worried that the cake would look good, but not taste all that great. While the frosting may have been a tad bit sweet for my taste, the cake was surprisingly good. I would generally pick chocolate, almond, or citrus – or anything really – over plain white cake, but this was pretty good. The layers were nice and moist with a good crumb and the cake itself had a nice buttery vanilla flavor and wasn’t overly sweet.
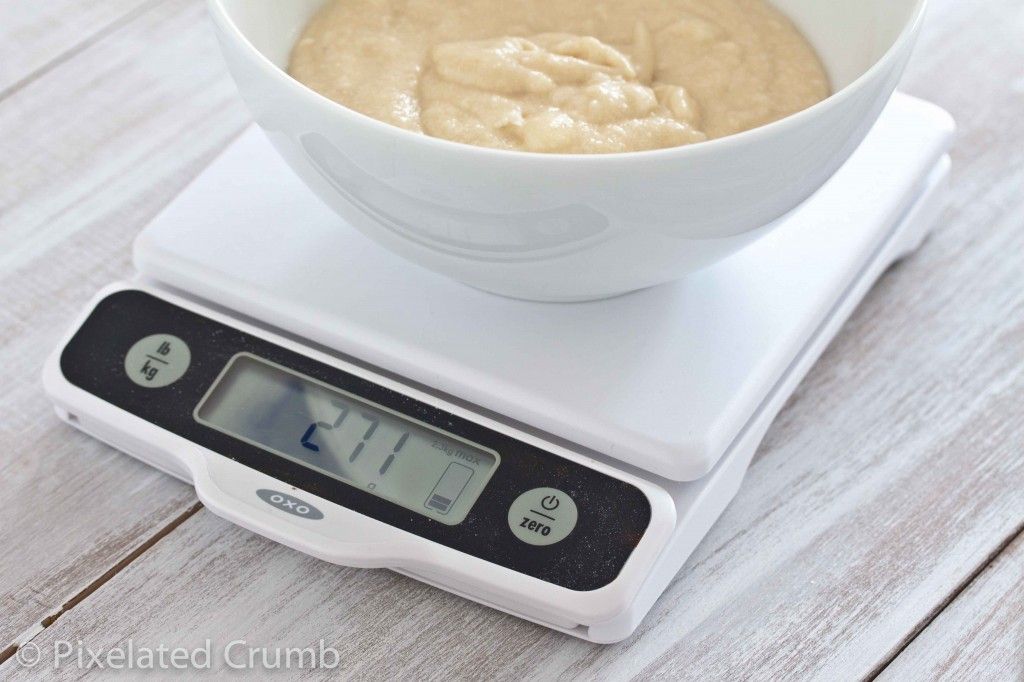
The key to getting perfectly even layers is to weigh the batter and divide it among the six bowls. While you could use measuring cups to figure it all out, you’ll get a more accurate reading and save a lot of time if you use a kitchen scale. The kitchen scale that Joseph got me back when we first started dating is one of my favorite and most used kitchen tools , so I was really excited when OXO sent me their Good Grips 5-pound Food Scale to try out and this was the perfect time to put it to use.
The scale worked perfectly for measuring out the ingredients, but I ran into a problem when I tried to weigh the batter in the mixing bowl to divide it into six batches. I had weighed the bowl empty so I was going to subtract that from the total weight with the batter, but eek! The OXO scale didn’t go high enough – it maxes out at five pounds and the mixing bowl with all that batter was more than it could handle. In all the years that I’ve used my kitchen scale, I think this is the first time I’ve needed to weigh something over five pounds so I don’t think this is a deal breaker, but definitely something to be aware of.

On the plus side, the OXO scale measures in one gram increments whereas my old scale weighs in two gram increments. This was very helpful when weighing out the six bowls because I could get a more exact measurement (but of course I had to use the old scale to calculate the overall weight). When you turn the OXO scale on, it automatically goes to whatever measurement unit you were using last, grams or ounces, which is a really nice touch. The most innovative feature is the display face of the scale which can actually be pulled away from the rest of your scale. It doesn’t happen often, but there have been a handful of times when I was trying to weigh something in a large pan or bowl that covered up the scale display. The other thing I really like about it is that if you zero the scale with your bowl on it and then take the bowl off, it will actually show the weight of the bowl in the negative. Again, a very nice touch. Want a chance to win an OXO scale of your very own? Well, you’re in luck! OXO sent me an extra scale to send to one lucky reader!
Giveaway Details #
This giveaway is now closed. Congratulations to Mike for winning the OXO Good Grips Food Scale!!
This giveaway is open to USA residents and will be open until Sunday, April 1st at 11:59 pm ET. The winner will be selected on random.org on April 2nd. The winner will be announced on Pixelated Crumb and I will send her/him an e-mail. Make sure your e-mail is correct, because you only have 48 hours to respond to claim your prize before another winner is chosen!
To enter the OXO Good Grips 5-pound Food Scale with Pull-Out Display Giveaway:
Write a comment below about your favorite birthday cake.
For Additional Entries
For more chances to win, complete one or more of the following steps and write a comment below for each extra entry (e.g. “I follow @pixelatedcrumb on Twitter”). If you already do any of the following, just leave a comment letting me know. You get an extra chance to win with each entry!
- Follow @pixelatedcrumb on Twitter
- Tweet about the giveaway (be sure to include @pixelatedcrumb in the tweet)
- “Like” Pixelated Crumb on Facebook
- Subscribe to Pixelated Crumb via RSS or e-mail
Rainbow Cake
Adapted from The Whisk Kid and America's Test Kitchen via Diamonds for Dessert
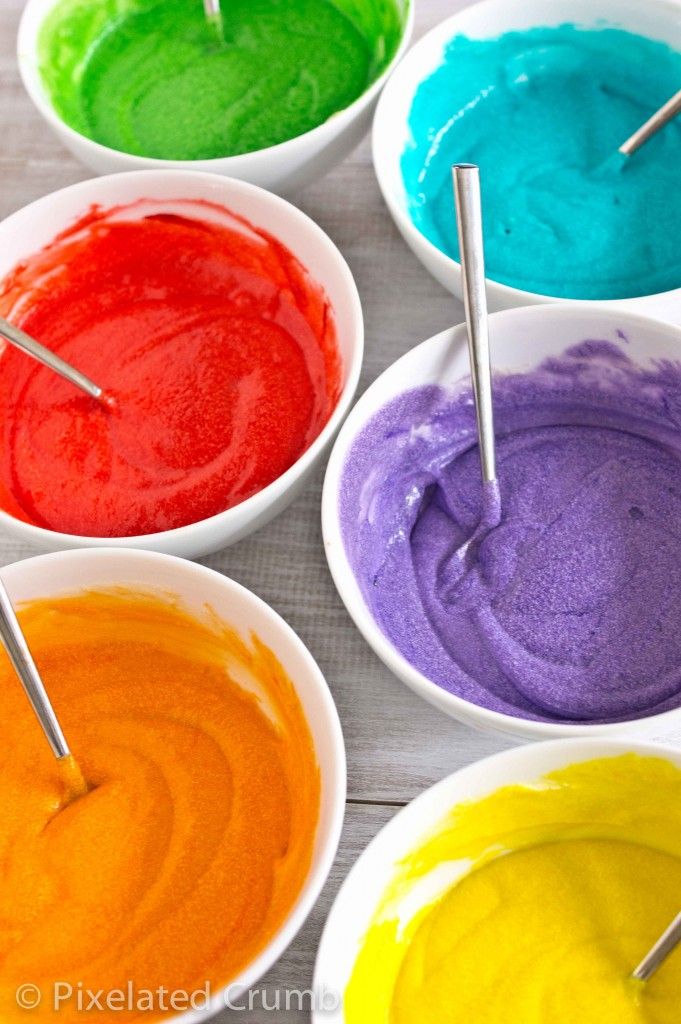
In case you're wondering what dyes I used, they were Red Red, Orange, Lemon Yellow, Leaf Green, Sky Blue, and Violet, all from Wilton. I've always heard that you use just a drop of gel colors because it goes a long way, but I found that I had to add a fair amount (a fair amount being maybe 1/8th of a teaspoon, or possibly even a bit more for some colors) to get rich, bright colors. Of course, you can use whatever colors you want so feel free to make a cake with your favorite team colors or make a pretty pastel Easter cake or whatever your heart desires! You can even dye the frosting if you want.
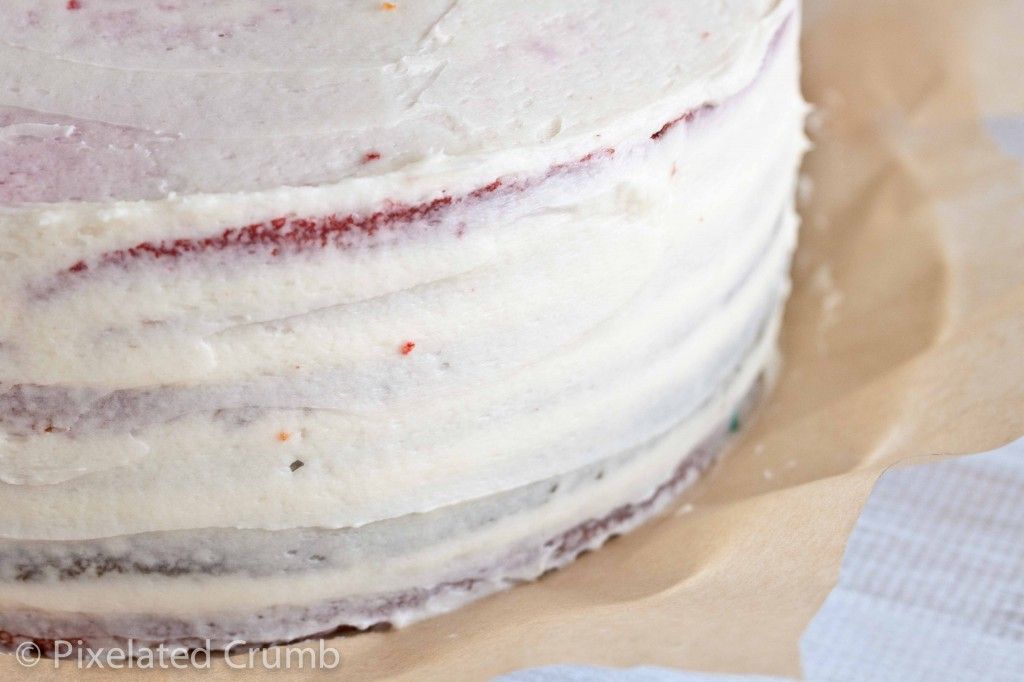
I've doubled the frosting recipe from the original - this will give you plenty of frosting for all six layers so that you don't have to panic and make more like I did. I rarely bother doing a crumb coat (spreading a very thin layer of frosting over the cake and refrigerating it until set before covering with the rest of the frosting), but I highly recommend it with this cake. You're going for impact here and the crumbs are pretty bright and they're going to stand out if you don't trap them down in the crumb coat first.
Ingredients
For the Cake:
- Vegetable shortening
- 330 grams (3 cups) all-purpose flour
- 4 teaspoons baking powder
- 1/2 teaspoon salt
- 1 cup (2 sticks) unsalted butter, room temperature
- 525 grams (2 1/3 cups) sugar
- 5 large egg whites, room temperature
- 2 teaspoons pure vanilla extract
- 1 1/2 cups milk, room temperature
- Red, orange, yellow, green, blue, and purple gel food coloring
For the Frosting:
- 3 cups (6 sticks) butter, room temperature
- 6-8 cups powdered sugar
- 6 tablespoons milk
- 4 teaspoons vanilla extract
Directions
For the Cake:
- Preheat oven to 350 degrees. Brush six 9-inch-round cake pans (or as many 9-inch cake pans as you have, reusing them as necessary) with shortening. Line the bottom of each cake pan with parchment paper; brush again and set aside.
- In a large bowl, whisk together flour, baking powder and salt; set aside. In the bowl of an electric mixer fitted with the paddle attachment, cream together the butter and sugar. Slowly add the egg whites and mix until well combined. Add vanilla and mix until fully incorporated. Add flour mixture and milk in two alternating additions, beginning with the flour and ending with the milk. Mix until well combined.
- Divide batter evenly between six medium bowls. Add enough of each color of food coloring to each bowl, whisking, until desired shade is reached. Transfer each color to an individual cake pan. Transfer to oven and bake until a cake tester inserted into the center of each cake comes out clean, about 12-15 minutes (working in batches if necessary).
- Remove cakes from oven and transfer to a wire rack; let cool for 10 minutes. Invert cakes onto a wire rack; re-invert and let cool completely.
For the Frosting:
- Cream the butter. Mix in 6 cups of powdered sugar. Add the milk and vanilla extract. Then if necessary, mix in more powdered sugar, adding it 1/4 cup at a time until you reach desired consistency.
Assemble the Cake:
- Using a serrated knife, trim tops of cakes to make level if necessary. Place three or four strips of parchment paper around the perimeter of your serving plate or lazy Susan. Place the purple layer on the plate. Spread the frosting over the layer with small offset spatula so it extends just beyond edges. Repeat process with blue, green, yellow, and orange layers.
- Place the remaining red layer on top, bottom-side up. Gently sweep away any loose crumbs with a pastry brush. Using an offset spatula, cover the top and sides with a thin layer of frosting. Refrigerate until set, about 30 minutes.
- Using an offset spatula, cover the cake again with the remaining frosting.